Monday, September 14, 2009

Tutorial: Sandpaper Letters / Numerals


Not having a lot of room, and not having a lot of money I was forced to economize this project. So I've decided to use both sides of these boards. If you wish to make a full set of each alphabet, you'll need twice as many pieces as I used. (this method isn't ideal for beginning learners since there is more chance for confusion, however, my homeschooler already knows the print letters and fully grasps the differences. When it comes time to teach the other 2, I'll be right there to help guide them)
Alphabet - 26 5"x5": 2 - 4 sets
Digraphs - 16 5"x7": 1 - 2 sets
Numerals - 10 5"x5": you'll only need one set of these
Materials:
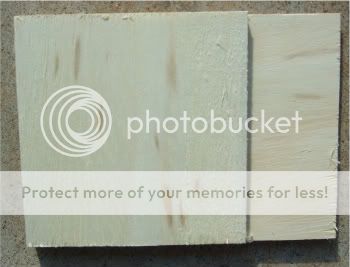
-I used 1/4 inch thick "Sand-a-ply" which is probably a brand name. It is just plywood with 2 good sides covered in a soft wood that is already roughly sanded but is also easy to sand. You can buy balsa or bass wood from the craft store but it will be more expensive overall.
-Sandpaper 220 and 300 grit
-Craft paint (pink, blue & green +4 other colors if you are doing 2 sided) and painting supplies
-Wood glue
-Sand, I would have preferred white but all I found was "sand" colored. It came from the craft dept in a bottle
-A surface to apply the sand on, I used a tray
-Light acrylic spay sealer

-Use your favorite method to cut the wood - mine involved Hubs' best friend who happened to be visiting and had nothing to do while Hubs was at work :)
But he used our table saw and electric miter saw


-Sand the sides and edges of the wood. Since it should be rough sanded a 220 grit should be enough. On the particular kind of wood I used, it stayed a little "fuzzy", but don't worry, this will be resolved later. 180 is a rougher grit, so if your wood isn't pre-sanded or is a harder wood, use that.
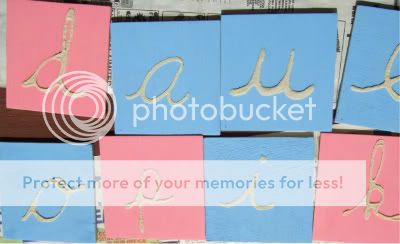
-Paint the wood in the Montessori colors you choose. There are different examples out there, ultimately I chose Apple Barrel Valentine Pink for consonants, Apple Barrel Carolina Blue for vowels and Apple Barrel Spring Green for digraphs.
- Sand again with 220 -300 grit. If you didn't see any fuzz or raised grain before, you will after you've painted.
-Retouch any spots that need it after sanding
-Have you chosen your font? Learning Curve and Penmanship Print are my favorites. But in the end I just free-handed it based on these.
-Draw a faint pencil line of your letter.


-Go over the line with wood glue


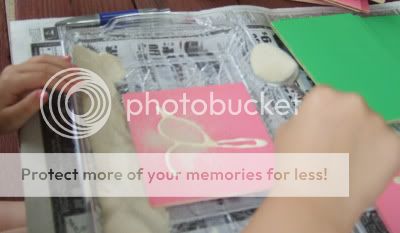
-Pour the sand over the glue, be generous what ever doesn't stick will fall into the tray and can be reused.


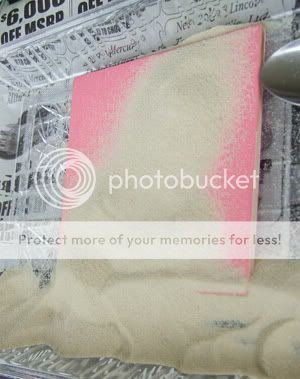
-Let it sit for a few minutes then shake it off on the tray.
-Allow at least a day for the glue to cure then continue.
* Go to the last step if you're making individual sets

-On the opposite side repeat the steps
-I recommend choosing the most different letters and to turn the wood upside down to limit confusion. Which ever way you choose, make sure they're all the same relative orientation.
-Also, Pick 4 additional colors of paint (or paint pen, or alcohol based marker).
-For 1 set: Line up one of the cases, ie all lower-case cursive lined up correctly and paint the top end (the 1/4 inch thick part)
-Paint each of the other sides a different color so that when they are in the tray it is easy and clear to see that they are aligned properly
-For the second set, make sure you use a different combination of colors so it isn't easy to mix up the sets if children will have access to both. Ideally, use 8 colors. If you're a crafter, you've probably got that many ;)

-After the glue has cured, spray with light coat of acrylic spray, not enough to impede the sanded texture but enough to help keep it clean in case the finger "sensitizing" didn't happen first.

Saturday, September 12, 2009

First Weekly Round Up

Really, my intention was to post something everyday, but this is my real life and that just doesn't happen. So I finally sat down and typed out what we did this week!
The bulk of our concentrated homeschool lessons take place on Mon, Wed, Fri when both the younger kids are in preschool. Monday was out due to the holiday.
The other days we worked on (in order of how I happen to remember it): Copy work from How Many Teeth- which also served as one of our reading lesson books, continued to study the human body and 5 senses. Talked about family relations and terms. We solidified memorization of our address- verbal and written, drew a family tree graph, reading practice with an opposites puzzle, journal work, drawing and coloring, sticker activity workbook, review of cursive letters we've already worked on, discussion of neighborhoods & community workers such as police officers and firefighters, when and how to call 911, beading, sorting, patterning, rhyming, days of the week, baric tablets, lacing, 3 part classification cards - um I'm drawing a blank so perhaps that was all!

Friday, September 11, 2009

Given the many different theories on homeschool curriculum, and the fact that I consider our homeschool to be eclectic, I had a lot of choices for making our overall lesson plan. I decided I'd consult with an expert - AT. I figured she knows best which way of learning and planning gets her excited. Together we determined that we'd start with her as a subject and keep expanding from there. I would set the overall lessons for the day but she gets to pick her work when she wants to. And that's it; pretty simple. Today for instance, she did copy work (a Charlotte Mason idea) from How Many Teeth, a favorite topic of hers that falls in with the "about my body" category, the she wanted to do color sequencing and patterning with beads, and right now she is doing a Priddy Books sticker activity book. The concepts within it are pretty easy for her, but she gets practice with concentrating, problem solving and fine motor skills - all of which she needs to work on. Throughout the day, we'll have discussions about the supporting roles neighbors, friends, neighborhoods and towns play in our everyday lives. Possibly also reasons for creating towns.

There is leeway in my lesson plan to account for her varying interests and frankly, for her moods. I don't really talk about the Montessori materials in this plan, as that is one of the things that we don't plan. Our use of the Montessori materials is 95% child led. Like in a classroom, I remind her of the presence of certain materials, but in general she decides when and what, or not. Here is the initial time-line outline I devised.

1. First Middle Last name
2. Birth date
3. Street address, Town name
4. Family
5. Neighbors / friends
6. Neighborhood / town
7. City (we live in a suburb of a large city so I'm using that opportunity to separate concepts)
8. State
9. Country
10. Continent
11. Earth
12. Solar system
13. Galaxy
14. Universe

If you'd like an expanded version of this outline, with some of the specifics under each heading, you can download our Homeschool Lesson Plan Outline

Wednesday, September 2, 2009

Montessori Checklist

I'm glad my Montessori Skills Checklist has been downloaded so many times - it's not a ton, but more than I expected. I'd love to hear from you if it has been helpful!

Tuesday, September 1, 2009

First week plus some

Although we've been unschooling for quite some time, last Friday AT and I had our first one-on-one-sit-down-and-learn session in a long time. I didn't take photos because my camera is full and I haven't had access to Hubs' computer to download them. And I've had a way busy week followed by 3 days in bed sick, anyway....
My plan is to start with her and get bigger until we're at the universe level adding in lessons and projects as they're appropriate. In that vein, we worked on writing her name in print and cursive and remembering how to spell our 8 letter last name. We've done self portrait type art projects. Talked about body parts and functions.
For Montessori activities I've presented cylinder blocks, the pink tower, the brown stair, numerical rods and Montessori materials 3 part cards. She's also done various sorting, beading, tracing, and practical life activities.
I think that's pretty good for 2 alone sessions, one of which was conducted almost entirely from the couch! And one session with her little brother present. Tuesdays and Thursdays AK will be here too so those days don't always go as planned. Today, we're just reading a book about bodies and then I'm going to trace their whole bodies (I"ll do GR's when she gets home) and have her draw in some of her organs. I'll probably have to to another one so she can draw clothes and accessories!
Time to rescue the matchbox cars from behind the couch for the umpteenth time and then rest my poor head a bit!